MongoDB Tutorial 9 : Database Create and Drop
Creating a Database
Open the command prompt and navigate to the /bin folder of the MongoDB using the
cd command and execute the command mongod there. This will initiate the MongoDB server. We have to keep this command prompt window alive, as this is running MongoDB. To stop the MongoDB server, simply enter exit and press Enter.
Now, Open another command prompt and navigate to the /bin folder of the MongoDB again and execute the command
mongo. This will open up the client to run the MongoDB commands.

In the command prompt window in which we ran the
mongo command, after successfully connecting to the mongodb, just type the command the following :use database_name
This will create a new database with the name database_name if there is no database already present with the same name. If a database already exists with the mentioned name, then it just connects to that database.
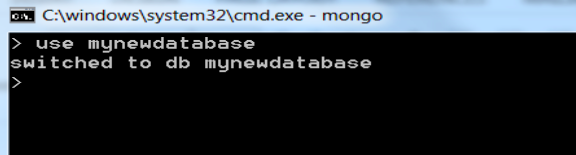
In the above picture, it creates a new database called mynewdatabase and will also connect to the same.
To check the current connected database, type in
db in the command prompt window, and you will get the name of the current database as result.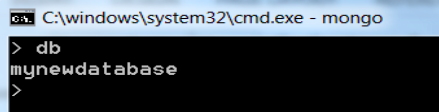
To see the list of all the databases in MongoDB, use command
show dbs
Please note that the newly created dstabase mynewdatabase has not been listed after running the above command. This is because, no records have been inserted into that database yet. Just insert one record and then run the command again as shown below:
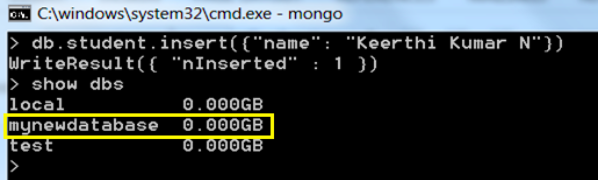
To Insert data, run the following command. Dont worry about it, we will learn this in detail in next lessons.
db.student.insert({ name : "Viraj" })
NOTE : In MongoDB,
test will be the default database. If no database is created, then all the data will be stored in the test database.
Comments
Post a Comment